How to Create Wireframes For Mobile Apps
Developing a website that lacks a wireframe is like constructing a home that has no blueprint. Wireframes are diagrams that show how a website will work and how people will browse through it. If you skip the wireframe process, you can end up with a site that has a bad user experience. You’ll learn how to construct a wireframe using the right processes by going through this post.
What is a Wireframe
A wireframe is a diagram or layout that can assist you as a programmer or designer to have a clearer thought and communication on the structure of the software or website you’re developing. Wireframes are layouts for how a product will look.
A wireframe is a structural piece showing how command and functionality on a website should be laid up, taking into account user requests and explorations. At the core base of product development, wireframes are used to build the basic framework of a webpage before visual design and content are introduced.
Most designers don’t include logos, graphics, fonts, or other features in their wireframes. They concentrate on the structure of the website or application, quickly laying the groundwork for the ultimate output.
Why wireframe is important in web design
With wireframe, one has the best strategy to quickly and easily spot any usability problems in the design phase. They assist designers in sketching down their concepts, either physically or digitally, to decide what attributes and functionality their design requires. While there are numerous advantages to wireframing, the following are the most important:
- Define the features and functionality that are expected, discover errors at an early stage, and subsequently saves time on modifications
- Early detection of possible complications with user experience
- Create a structure and arrangement plan for various types of content
- Wireframes are an excellent approach to show customers and stakeholders the configuration of your designs without distracting them with colors and visuals
- Wireframing offers the chance to learn more about your client.
Who Creates Wireframes
Not just anyone can come up with wireframes. Professionals like information architects, programmers, interaction designers, product managers, graphic designers, business analysts, and user experience designers can be trusted to come up with a wireframe.
Wireframes serve as a bridge that links information architecture to the visual design therefore working with them may require a joint effort.
How to Create a Wireframe
Before you begin developing a wireframe, there are a few things that must be done.
Of course, it might take a long time to create a wireframe — particularly if things don’t go well during the testing phase. Taking the effort to smooth out UX flaws ahead of time, on the other hand, will offer your site a much higher chance of long-term success.
Stages For Creating Wireframe Applications
Here are a few pointers that will ensure the design phase goes more smoothly and efficiently. You can begin by following the 7 steps outlined below.
Stage 1: Do a thorough inquiry
Keep in mind that UX design is a process, and wireframing is not even the initial stage.
You must have completed the first two processes, which include doing user research, establishing requirements, generating user personas, and identifying use cases, as well as conducting further competitor and industry research. Also, if you’re working on a new feature, don’t be hesitant to go beyond your domain for inspiration.
Stage 2: Make a short reference list of your findings
Just begin to think of the number of quantitative and qualitative data that will be generated by the various phases. So, that’s what you need to have at the back of your mind as you create your wireframes. You could find it difficult to remember everything, so make a cheat sheet containing your business and user objectives (requirements), personas, use cases, and possibly some reminders of the best characteristics you discovered throughout your rival research.
Stage 3: Plan out your approach to help you get through the process
After you have brainstormed, you’ll be able to determine your general objectives. It’s then a good idea to prioritize which roles and elements in your plan are the most crucial. To do so, make sure you have a clear vision of what you want to accomplish with your project and how your ideas will contribute to that.
Stage 4: Create flowcharts to help you manage your pages or screens
If there is any uncertainty in the number of screens to be created and the thread you anticipate the user to follow, your wireframing will rapidly become a muddle.
How do you expect your application or website’s users to engage with it? After you’ve brainstormed and figured out your overarching approach, it’s critical to create a flow chart. You’ll understand where particular buttons go and how they connect with the rest of your design if you create a flowchart.
Simplicity is important. Keep things simple to understand. To demonstrate interaction and flow, start utilizing arrows and buttons.
Stage 5: Make a draft, not a drawing. Make a sketch rather than an illustration
Recall: You’re sketching out and expressing themes and structures rather than displaying them in precise detail.
While you’re drawing, consider these four questions:
- How can you structure the element to help your users achieve their objectives?
- Which details should be highlighted the most? What is the best place for your primary message? When a person initially visits the website, what should they see?
- What do you think the user would anticipate seeing on different parts of the page?
- To perform the intended activities, what controls or clickables does the user require?
Again, remember that your wireframe is only an idea; when creating your wireframe, focus on the essence of your product. Try out multiple different versions of your layout while developing your wireframe online, test them out personally, and see what works adequately.
Stage 6: Add some depth to your design selections and put them to the test
To complete your wireframe, you must now include additional informational data.
Add information, in the same manner, you would on a screen or a page of a book: top to bottom and left to right.
Consider the following approach:
- User experience customs, such as placing the nav near your emblem at the upper edge, having a search option on the top right-hand side, and so on
- Calls-to-action, for example, should include simple, instructive phrasing
- Components that foster trust: What do you need to establish trust with your consumers, and where should you put these elements?
- Tooltips that will indicate functionality that may be incorporated in a prototype transition.
- As you begin to construct your wireframe, you should begin to include specifics such as elements, colors, and fonts.
After you’ve completed all of this, you’re ready to conduct your first user testing. Because testing entails user involvement, it’s frequently employed in the context of prototypes. However, easy testing for a flow constructed from wireframes is achievable. Obtaining additional perspectives and ideas allows you to fine-tune your design.
Stage 7: Start making prototypes out of your wireframes
You may begin creating your high-fidelity prototypes after you’ve recorded and worked on the feedback from your prototype. There are a plethora of useful programs available for this.
What Should Be Included in a Wireframe?
A wireframe’s main purpose is to graphically portray the screen’s layout. It’s critical to make your wireframes as minimal as possible. A wireframe, for example, might represent the layout of content, interface components, navigation, and so forth.
Have these in your mind:
- Use grays, whites, and blacks as your preferred colors
- The layout of the page. Visual components are arranged in a circle around one another
- Make use of a font that isn’t too specific. This keeps the user’s attention from being drawn away by the typography’s style
- The website’s functionalities Video, photos, and links, for example. (The functionality has not yet been conceived or created.) It’s just given a location on the wireframe.)
- The user’s experience. When a user clicks on anything or fills out a form, what appears next?
- The relative relevance of certain features. Consider the size of the banner in comparison to the subscription form
What shouldn’t be included in a wireframe:
- Graphics and pictures with a lot of stylization should be avoided.
- Interactions. Drop-down menus, clickthroughs, hover animations, and so on
- Content. Developers may use placeholder text to demonstrate the amount of content that may be handled, but it is never the final copy.

What Makes Wireframe Good
A collaborative effort and iteration are made easier with a decent wireframe. This means that a smart wireframe won’t include anything that will cause stakeholders to become distracted from making judgments regarding the website’s layout.
Rather, it will include the following:
- An emphasis on the practical purpose of the website/app rather than the cosmetic design
- Attributes on different pages/screens are consistent.
- Features are explained/elaborated via annotations.
- A diagram depicting the user’s path from one page to the next.
Types of Wireframes
Wireframes are classified into many categories based on their reliability. There are significant changes in the level of realism in each wireframe.
The wireframing method is made up of several components. The four wireframe techniques which are used as follows:
- Paper wireframe (Hand-Drawn)
- Low-fidelity wireframes (Lo-Fi)
- Medium-fidelity (Mid-fidelity)
- High-fidelity wireframes (Hi-Fi)
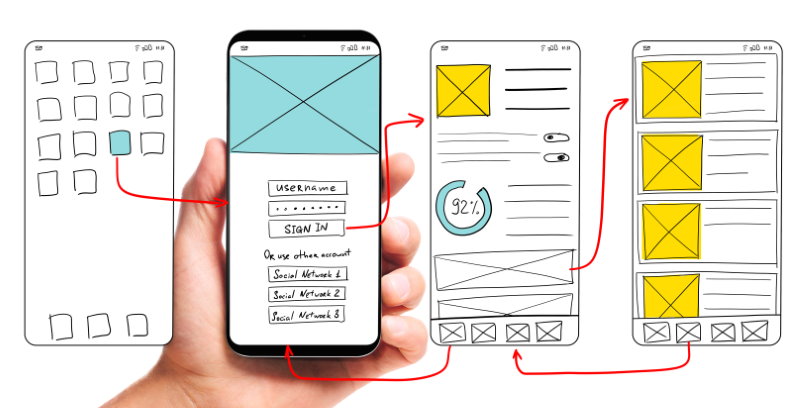
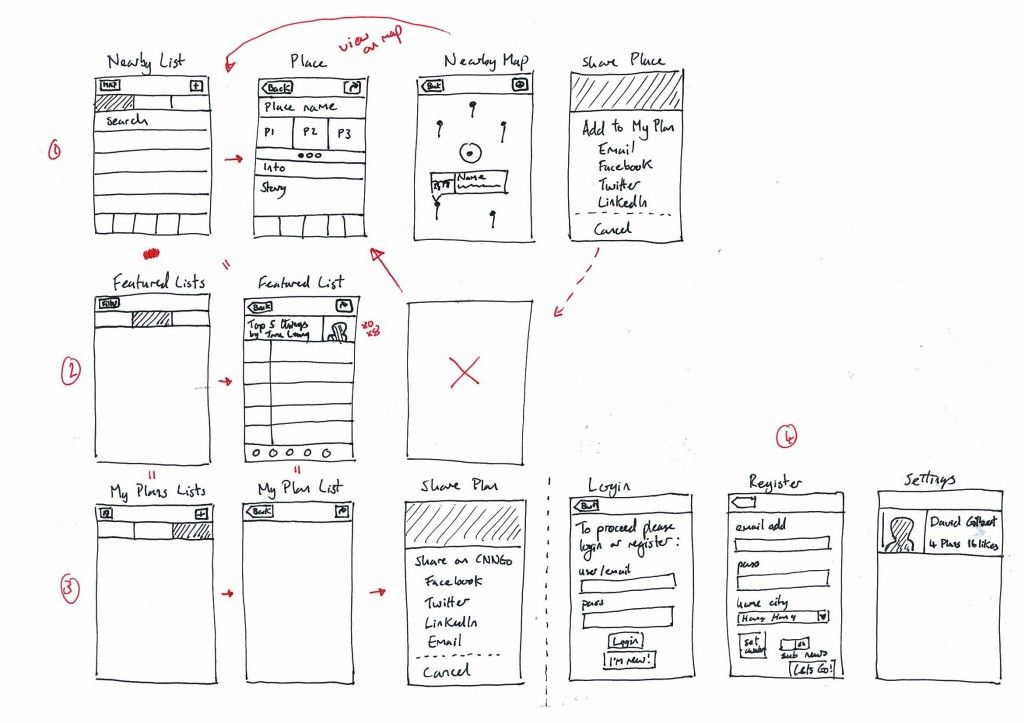
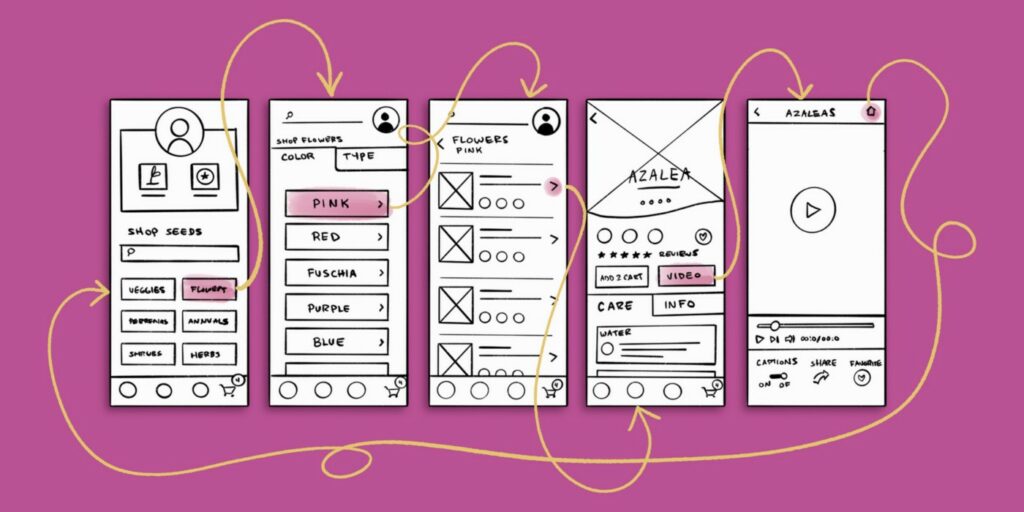
Type 1: Paper wireframe (Hand-Drawn)

This is the easiest way to create wireframes and get your concept down on board. The traditional paper wireframe has long been the most common design wireframe. Paper wireframes are an excellent way to get started on a first draft and formulate your thoughts visually. However, before you begin adding elements to your creation, you must first save it to your pc.
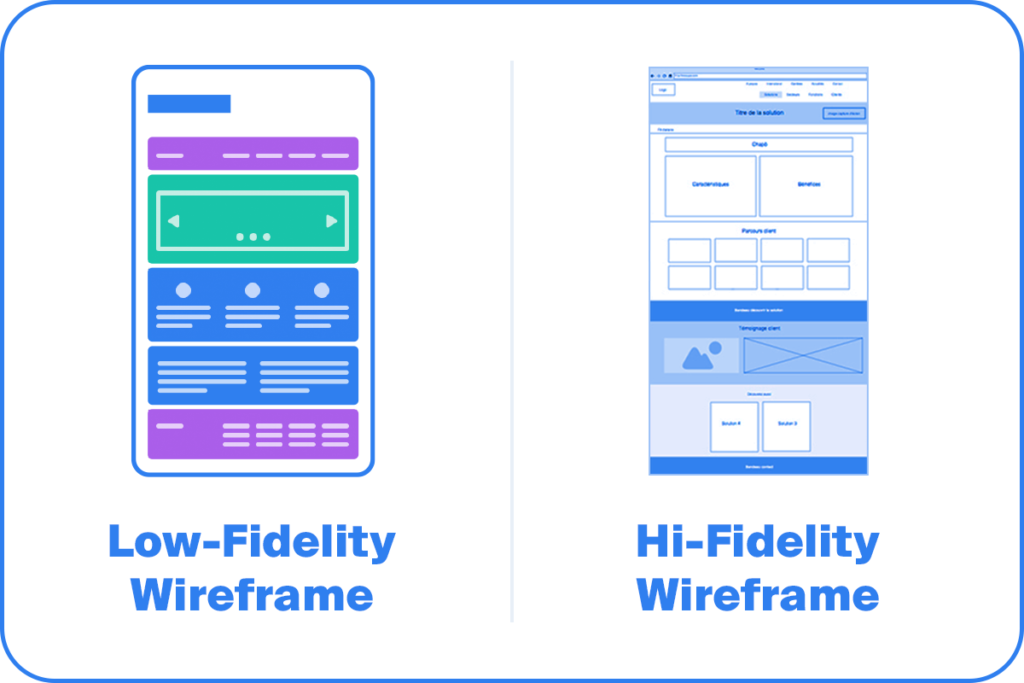
Type 2: Low-fidelity wireframes (Lo-Fi)
The low-fidelity wireframe is the first and most basic kind. These can be made by hand or using a computer tool. This is when you start visualizing your designs with a software program. Consider it the framework of a website or app. Some platforms have component packages that make it simple to add a button or a banner to a screen to make your argument clear. It’s pointless to build everything from scratch when you can use existing components.
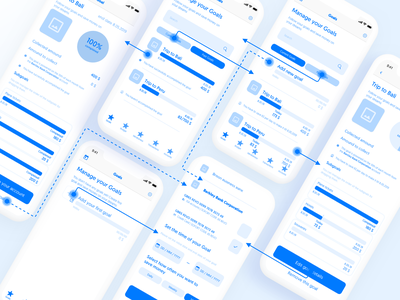
Type 3: Medium-fidelity wireframes (Mid-fidelity)
A mid-fidelity wireframe is much more detailed when compared to a low-fidelity wireframe and is the next best thing to the final UI design envisioned. While photos, fonts, and comprehensive information are still missing, they provide a solid overview of artboards and essential features.
A mid-fidelity wireframe might be the next stage after a low-fidelity wireframe or it can be the first step.
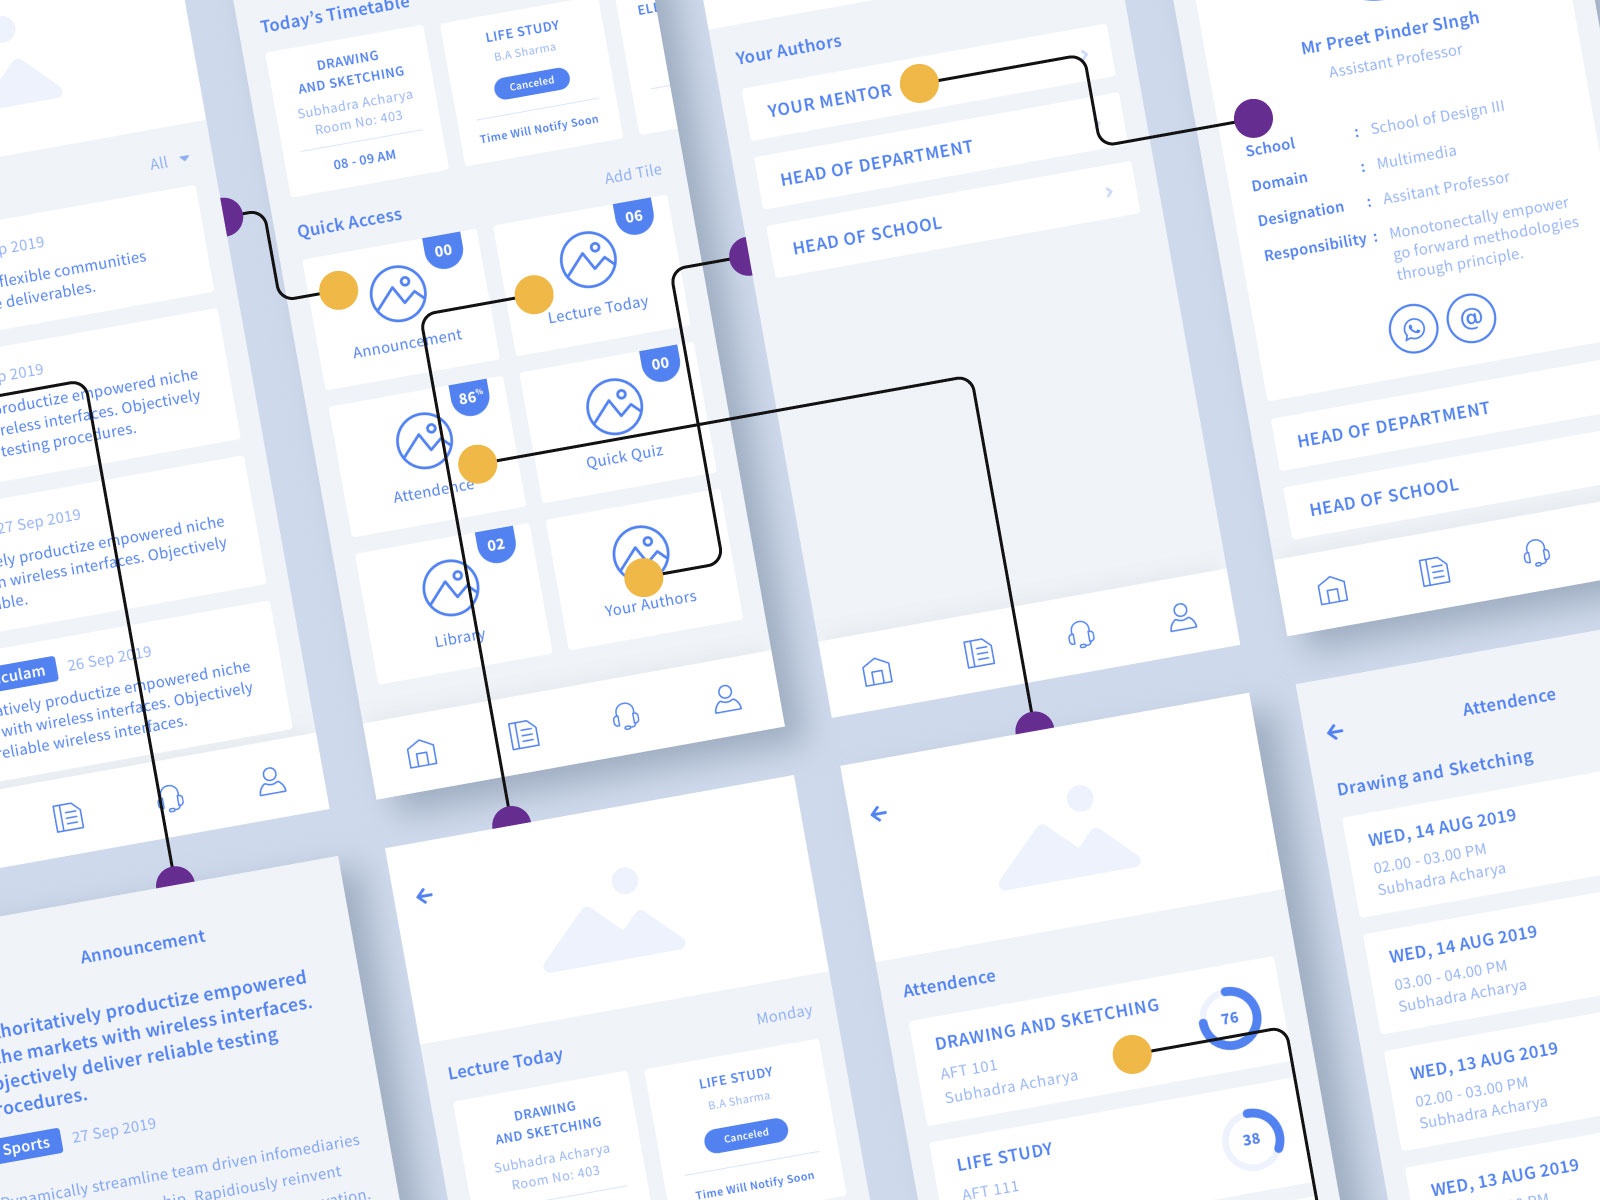
Type 4: High-fidelity wireframes (Hi-Fi)
High-fidelity wireframes make up the third form of wireframe. Wireframes that are high-resolution are far more detailed than those that are low-resolution or medium-resolution. In addition to precise typeface and picture selections, detailed information is now offered. The user interface elements, photos, icons, colors, fonts, buttons, and backdrops have all been placed and are ready to be made into a functional prototype. These are quite similar to the product’s or website’s final design.
To create high-quality wireframes, you’ll need a wireframing design tool. Hi-fi designs are frequently used by designers to demonstrate to developers how they prefer the design to look.
Customers will begin to feel as though the designs are theirs at this stage.
Pros and Cons of Wireframes
Advantages of Wireframing:
- A wireframe is a preliminary graphic that may be explored with the customer.
- Users can use it to provide early feedback on prototype usability testing.
Disadvantages of Wireframing:
- It’s not usually simple for the customer to comprehend the concept because the wireframes don’t contain any design or account for technological considerations.
- Whenever content is published, it may be too much to fit inside the wireframe structure at first, therefore the designer and writers must collaborate effectively to make this workable.
How Much Does It Cost To Create a Wireframe
The length of time it takes to design a wireframe differs based on the complexity of the application and the number of modifications each screen will require before it is finished. The average price per screen is around $50, with some screenings taking several hours to complete and others only requiring 30 minutes.

Tips For Creating a Wireframe
Before you start developing a wireframe, you need to accomplish a few things. Defining website requirements, ranking the value of each piece on a page, and thinking about how users will engage with it are just a few of the basic responsibilities. The suggestions below can assist you in getting started straight away.
Tip 1: Find out what a wireframe is and what it can accomplish for you
Understand all there is to know about wireframes and what they do. This article is a fantastic place to start. Look for accessible digital wireframing software or try making them manually. To avoid becoming overwhelmed, begin with a simple assignment.
Tip 2: Stakeholders should be consulted
Schedule a meeting with the key stakeholders to learn about the project’s overarching aim and what they want potential visitors to accomplish when they visit.
Tip 3: Check out other wireframes. Inspiration may be found in wireframe samples
Looking at other wireframes for insight is a wonderful method to improve your wireframe creation skills. Look at Behance and Dribbble, for example. You’ll have a simpler time constructing your wireframe if you search for inspiration because the concepts will have gained a foothold in your mind.
Tip 4: Every button should be visible
This isn’t the moment to start developing something new. Use the same form for all buttons on the site, whether they’re rectangles or have rounded corners.
Tip 5: Discover how to utilize professional wireframing software
Wireframing software like Figma, Adobe XD, or Sketch can be tried out for a more professional workflow. With drag-and-drop capabilities, these tools combine wireframe and interactive prototype creation in one spot.
Tip 6: Use grids and boxes to help you organize your work
Utilize an online application that gives grids to assist with the proportion of objects on the page. Grids may be used as a reference to help you decide the right spacing between items and to get a sense of how things will appear on the page. Use boxes to represent page components like writing, graphics, and advertisements.
Tip 7: Don’t leave out essential elements
Important elements like the fields a user will need to fill out before pressing the “Submit button” in the wireframe for a page that collects payments should be included for instance. Also, think about the site’s navigation and where you’ll put user login areas, content, search boxes, and the organization logo.
Tip 8: Start with low-fidelity wireframes rather than high-fidelity wireframes
If you are passionate about making wireframes, do not even think of starting with high-fidelity. It will take you longer than planned to complete your tasks.
Tip 9: Interactions should be introduced early on
Adding interactions to wireframes is still necessary, even if prototypes are the instrument for physically testing interactions. These are necessary for usability testing and a well-designed user interface. A wireframe without a visual representation of how it all fits concurrently is just a collection of pictures with no clear direction.
Tip 10: Keep the number of tools you employ to a bare minimum
A wireframe’s fundamental and most important feature is that it’s simple to modify and change. If you start with two or more tools, you’ll need all of them every time you need to make an amendment. It will be easier to work on iterations and modifications if you start with a single tool or system.
Tip 11: Drop the wireframe for feedbacks
When you’ve finished the wireframe, it’s essential to get comments from others. Try utilizing an online resource that allows you to share the wireframe with others while also allowing you to change and comment on it.
Tools For Creating a Wireframe
Here’s a selection of wireframe tools to assist you to come up with the right concept.
1. Figma
Figma is as straightforward to use as you’d want. Figma doesn’t come with any built-in UI elements, but it does allow you to upload your own or utilize pre-designed equipment.
2. Adobe XD
Adobe XD is a vector-based design tool that works in conjunction with other Adobe products like Photoshop, Illustrator, Adobe Fonts, and Adobe Stock. It’s also one of the most expensive tools on the market. It’s also compatible with Microsoft Windows and Mac OS X. Adobe XD’s sole drawback is that it requires an Adobe membership to use all of its features.
3. Sketch
Sketch’s clean and straightforward interface, as well as its concentration on generating excellent UIs and icon vector design, makes it a must-have for Mac-based designers, even though it is not accessible for Windows.
The Symbol tool in Sketch is one of its most useful features since it allows you to generate objects that will automatically recur throughout your layout. A free trial is available for Sketch.
4. Lucidchart
Lucidchart is a great wireframe solution option for diagramming and visualization of data, and it has a lot of collaborative options. Lucidchart has a presentation function that will seamlessly integrate with Google Slides when it comes to displaying your work.
5. Framer
Framer is an internet platform that is suitable for professional prototyping and is readily accessible for Windows and Mac operators. It comes with a fairly comprehensive free option. Framer is one of the greatest freeware wireframe tools available, with the option to add up to two editions and create three projects.
Conclusion
Wireframes bring usefulness to the forefront, and they’re a powerful tool for illustrating website structure and functioning. Wireframes encourage you and your clients to look critically at the ease of use, conversion routes, and element placement early in the design phase, and they help point out issues. All of these factors contribute to goods that are simple, easy to use, and enjoyable to use.
And that’s it! If you have any more doubts or need assistance producing wireframes for a startup, OSSystem professionals are available to assist you in creating wireframes or providing examples. We are here for you! You can get to us through our feedback form. Feel free to tell us about your startup.

Subscribe to us


